Monday, February 7, 2011

Putting my eggs into one basket

In a previous posting, I described how I made a basket using some simple tools in Adobe Illustrator. Here's the same basket loaded up:


This final composition was done in PhotoShop. Each of the eggs, as well as the basket, table cloth and candles, is an Illustrator drawing. If I try to put all of that together in Illustrator, I quickly run out of memory.

A person who I rely upon for PhotoShop advice offered the criticism that shadows were noticeably missing from this piece. Each egg should have a shadow..., etc.

Damn! No, wait. My picture is just well-lit. That's it.

Friday, February 4, 2011

Illustrator Basketmaking 101

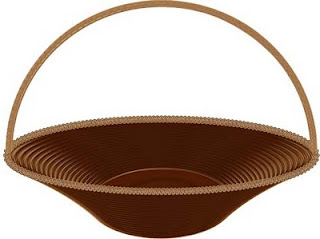
The Distort and Transform tool in Adobe Illustrator can really do some cool effects. This basket that I recently did was easy and involved just a few tools and techniques.

Here's how I did this.

I started with a small swatch that I made of short lines in various stroke weights and shades of brown/tan. I turned this into a pattern brush.

Once I had the pattern brush, I used the circle tool to create an oval that matches the lip of the basket. I applied the brush to the oval and tweaked the stroke some more until I was happy with the look.

The rest of the bowl was really simple: I used the Transform tool and started with an arbitrary 29 repetitions. I then tweaked the horizontal scale control down into the minus category (the Preview feature is really handy here). Then I tweaked the Move Vertical a bit into the minus category, watching the preview until I stopped seeing white space between the rings. Expand the Object, and that was all there is to the bowl of the basket. I added some extra body to the basket by copying the bowl layer, pasting it over the top of the original and shifting it horizontally and vertically several keyboard clicks. This worked to fill in the occasional blank space between coils.

The lip of the bowl was created from a fresh circle that I visually matched up with the top ring. Once again, I applied the pattern brush to that. To get that the cool windings, I used the Zig-Zag tool in the Distort and Transform tool set. You can see the dialog box for that below:

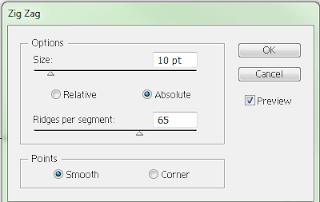
Like always, I turned Preview on, so I can see what I'm rendering. By setting Points to Smooth, I got a coiling effect instead of the basic zig-zag. Then I just pumped up the Ridges per segment slider until I got some tight coils. Voila!

Finally, the handle is the top half of a circle arc with the same wood brush applied. After thickening it up a little, I put another circle arc over that and applied the actual zig-zag transform to that.

Now I'm ready to put some Easter eggs in this basket!


Thursday, January 27, 2011

Where's the Beef?!!

Somebody at work turned me on to this guy's blog page, Words From The Mountains. If you clicked on that link -- why didn't you? -- you'd see the July 22, 2010, entry titled "The Ghost of Woodburn Hall." It tells the story of a prank from more than a century ago, when some agricultural students led a cow up into Woodburn's bell tower.

Cows being -- well -- dumb, this one managed the climb up several flights, but it seemed unable to walk back down. Consequently, it was removed in much the same way that the dead horse in Animal House had to be removed from the dean's office, albeit before the days of chainsaws. Thus was born the legend of the Woodburn Hall Cow, whose ghost is still mooing in the night.

Now the reason for the story about the unfortunate cow is because I had done a vector drawing of Woodburn Hall, based upon a night-time Christmas lights photograph that I had taken. I was able to catch the night-time look of the building, but I was hesitant to attempt the lighting effect.

Something about my showing this Illustrator drawing to a coworker caused him to remark that my picture needed a cow, whereupon he told me of the legend. Lest you think that I keep strange company, this person is a director-level at the University.

It's funny how an idea grows.

Wednesday, January 26, 2011

Stitching in Illustrator


Still on the subject of Ukrainian rushnyky, I thought I'd take on one of my mother's pillow embroideries (left).

She does these patterns free-style, with no design in mind when she starts. My interpretation used a single, uniform cross-stitch, whereas my mother's original features a variety of stitching styles.

I flipped the central portion and made it into a repeating brush pattern (right). It's funny how the eyedropper tool in Illustrator interpreted the orange-gold color -- it came across more bronze in Illustrator.

Saturday, January 22, 2011

Illustrator stitches

Some time ago, I showed off a few faux cross-stitch patterns of traditional Ukrainian "Rushnyky," literally towels.

I doubt I could claim credit for applying the techniqe of using a cross-stitch "X" pattern to build an elaborate design in Adobe Illustrator, but I came up with the idea on my own and developed it through experimentation.

Here's an inset portion, showing a two-color stitch pattern:Once you have a few patterns, you can start to replicate them and lay them out into a larger work. Here is a completed rushnyk from a design I copied:

There's a really cool trick you can do in Illustrator, where you can take something you've designed and make it into a pattern brush. The pattern brush can then be applied to a vector shape like a line, rectangle or circle. The basic square of this pattern lends itself particularly to a rectangle, because you can designate a specific design to be a corner piece in your brush pattern.

To do this, I first stripped away the outer zig-zag border. Here's what the replicated squares would look like in a corner pattern:Once the pattern brush is complete, you can begin applying it. Here is a circle within a square with the rushnyk brush pattern applied:


Note that you can change the stroke. The circle is one-half the stroke of the square. The only problem with creating these elaborate designs is that you can run out of memory when you try something large based upon an elaborate design.


Friday, January 21, 2011

GOP's not-so-secret agenda

I read this morning that with health care reform now "repealed," the GOP congress is going after climate change. Just like health care, the GOP sees any attempt to regulate greenhouse gasses as being job-killing.

According to Rep. Fred Upton, R-Mich., "We will be active and aggressive using every tool in the toolbox to protect American jobs and our economy by rolling back the job-destroying (greenhouse gas) regulations." (I suppose the Republicans' filibuster against the auto industry bailout last year was also done out of concern for jobs.)

It just so happens that I've obtained a hither-to unknown wikileaks release on the GOP's agenda for this year:

  1. repeal health care reform
  2. rewrite the Clean Air Act
  3. repeal the 14th amendment
  4. repeal the 13th amendment (arguably a symbolic gesture)
  5. prohibit the teaching of evolution
  6. declare war against Poseidon


Wednesday, January 19, 2011

Saving the Weasels

The GOP-controlled congress is living up to its promise of trying to roll back health care reform. HR 2 has been given the odd name of Repealing the Job-Killing Health Care Law Act. The words Repealing and Killing have negative connotations, however. If the GOP would take my advice -- they won't -- they should name the bill positively, say Save the Weasels Act.

Make no mistake about it -- since the current health care reform law has made it illegal to cancel an insurance policy because of a pre-existing condition, Insurance Policy Processing Clerks have been having a tough go of it. Many of these weasels, whose job it is to cancel insurance policies, have been out of work. You'd think that the GOP would have extended jobless benefits to these, their brethren. But they are looking at the big picture. If they help the insurance companies recover their enviable ability to cancel policies, then the weasels will have their jobs back. Brilliant!

Besides, weasels don't contribute much in the way of campaign donations.